Since I have had a few people ask for instructions how to make these paper pockets I
created a tutorial.
Start with a square of paper or cardstock and fold in half like this...
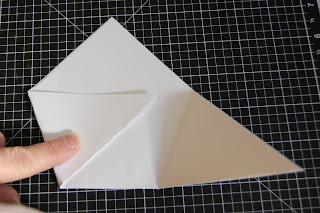
Next fold the bottom left point over and across like this..l
The key here is to make the top of this flap horizontal and parallel to the bottom of the pocket. (sounds like Math class)
Then do the same for the right point.
Then fold the top flap
(the triangle piece) down.
This creates a pocket, perfect for a treat and a tag.
Now I made a bunch of these with double-sided patterned paper at
Christmas. You can check out that post HERE.
I made these pockets out of White Daisy Cardstock cut in a 7 inch square.
Then I stamped them using the
"Whooo's Your Valentine?" stamps.
You can fill these pockets with candy, ornaments, notes, tags, etc.
I wish I could remember the original source where I learned to make these so I could give credit. But honestly, I have been making these for so many years I do not remember.
If you made it to the end of this long post, thank you for hanging in there with me!
If you make these I would love to hear about it so let me know in the comments section.
Have a good weekend!


6 comments:
So stinkin' cute! Thanks for sharing the how-to!
That owl makes me giggle every time it pop up on your awesome projects! Hey thanks for the tutorial!!
thanks for sharing!! i am def going to make these!!!!
these are so cute. i'm definitely going to try making some of these pockets
This is absolutely adorable!! I really love it all. Perfect!!
Fantastic tutorial! Thanks!
Post a Comment